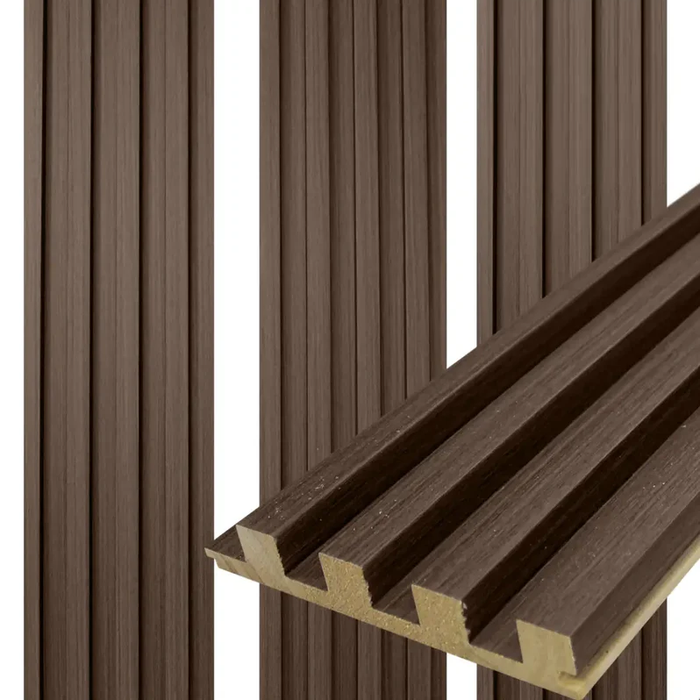
Real Solid Wood. Weathered Gray Finish. Coastal and Contemporary in Equal Measure.
Transform any interior wall with our Driftwood Slat Wood Wall Panels — real solid wood cladding panels pre-finished in a soft, weathered gray-brown tone that captures the look of sun-bleached, naturally aged wood. The Driftwood finish is cool and muted with subtle warm undertones — lighter than any brown wood, warmer than a pure gray. Panels arrive ready to install with no staining, sealing, or finishing required.
Each box contains 3 panels and an end cap panel, covering 12 sq ft. The vertical slat design connects seamlessly with no visible joint lines, and the weathered finish gives any wall an effortlessly relaxed, natural character that works equally well in coastal homes, contemporary interiors, and organic modern spaces.
Key Features
Real solid wood construction with smooth Driftwood veneer finish
Pre-finished in weathered gray-brown Driftwood tone — ready to install
Seamless panel-to-panel connection — no visible joint lines
5¾" wide slats with 3/4" thickness
Water-resistant material
94" box includes end cap panel for clean edge finishing
Install horizontally or vertically on any wall surface
Cut to fit with standard woodworking tools
Suitable for residential and commercial applications
Ships from San Diego, CA
Why Driftwood
Driftwood is the finish for spaces that want natural material character without any traditional wood warmth. The weathered gray-brown tone reads as relaxed and organic — it brings the texture and variation of real wood without the honey or chocolate tones of oak and walnut finishes. Against white and bright walls it creates a soft, low-contrast look that adds depth without drama. Against warm neutrals, it acts as a natural bridge between cool grays and warm wood tones. The shadow lines between vertical slats add movement and dimension that amplify the weathered quality of the finish — the result is a wall that looks like it belongs in a well-designed coastal home, a calm Scandinavian interior, or a refined organic modern space. If you've been drawn to whitewash, gray-wash, or wire-brushed wood finishes, Driftwood delivers that sensibility in a ready-to-install panel.
Coastal and beach-style interiors
Bedrooms and living rooms
Home offices and study rooms
Bars, restaurants, and hospitality spaces
Hotels, lobbies, and boutique retail
Hallways, stairwells, and accent walls
Product Specifications
Specification
Details
Material
Solid Wood with smooth Driftwood veneer finish
Finish
Driftwood — pre-finished weathered gray-brown, ready to install
Panel Width
5¾"
Panel Length
94"
Panel Thickness
3/4"
Water Resistance
Yes
Application
Indoor — Walls
Installation
Construction adhesive (Liquid Nails or similar)
Ships From
San Diego, CA
Box Contents
Detail
94" Length
Panels per Box
3 panels + 1 end cap
Coverage per Box
12 sq ft
Box Weight
17 lbs
End Cap Included
Yes — 94" × 0.8"
Coverage Calculator
94" Length (12 sq ft per box)
Area to Cover
Boxes Needed
Notes
50 sq ft
~5 boxes
Add 10% for cuts and waste
100 sq ft
~10 boxes
Add 10% for cuts and waste
200 sq ft
~19 boxes
Add 10% for cuts and waste
300 sq ft
~28 boxes
Add 10% for cuts and waste
How to Install Driftwood Slat Wood Wall Panels
Installation is a straightforward DIY process that most homeowners and contractors can complete in a few hours.
Step 1: Prepare the Wall Surface
The wall must be clean, dry, and flat before installation. Wipe away dust, fill any holes or cracks with wall filler, and let patched areas fully dry. A properly prepared surface ensures the adhesive bonds securely and the panels stay flat over time.
Step 2: Measure the Wall Area
Measure the height and width of your wall to calculate how many boxes you need. Add 10% for cuts and waste. Mark a level starting line on the wall to guide the first panel and keep the entire installation straight.
Step 3: Dry Fit the Panels
Before applying adhesive, place the panels against the wall to test the layout. Dry fitting lets you confirm alignment, identify where cuts are needed, and ensure a balanced result before anything is permanent.
Step 4: Apply Construction Adhesive
Apply a high-quality construction adhesive such as Liquid Nails to the back of the panel in vertical lines. Keep adhesive away from the edges to prevent squeeze-out. Ensure even distribution for a strong, uniform bond.
Step 5: Install the First Panel
Position the first panel against the wall using your level line as a guide. Press firmly and hold for several seconds. Use a level to confirm it's perfectly straight before moving on.
Step 6: Continue Panel by Panel
Place each subsequent panel directly against the previous one. The precision panel design creates a seamless connection with no visible joint lines. Check alignment with a level periodically as you work across the wall.
Step 7: Cut to Fit
At wall edges, corners, outlets, and fixtures, trim panels using a circular saw, miter saw, or fine-tooth hand saw. Measure carefully before each cut to maintain clean edges.
Step 8: Install End Caps
Use the included end cap panel to finish exposed edges cleanly on the perimeter of the installation.
Driftwood Slat Wood Wall Paneling Gallery
Why YouShouldHaveIt
Ships from San Diego, CA warehouse
In-stock — same or next business day shipping
Volume discounts at checkout
Expert team: (858) 261-4068, Mon–Fri 8am–4pm
Retail showroom in Santee, CA
Frequently Asked Questions
Q: What does the Driftwood finish look like?
A: Driftwood is a soft, weathered gray-brown — it mimics the look of sun-bleached, naturally aged wood. It's lighter and cooler than any traditional wood-toned finish but warmer than a pure gray. The result is a relaxed, organic character that reads as coastal, Scandinavian, or organic modern depending on the rest of the room.
Q: How does Driftwood compare to the other wood finishes?
A: Light Oak is a warm honey-toned wood — classic and traditional. Oak Brown is a richer medium-toned brown. Walnut is deep chocolate-brown. Driftwood is the lightest and coolest finish in the lineup: gray-brown rather than warm-brown, with a weathered quality the other finishes don't have. It pairs naturally with white walls, gray walls, linen textiles, and coastal or Scandinavian interiors.
Q: Is this a pre-finished panel?
A: Yes — these panels arrive pre-finished in Driftwood and are ready to install. No staining, painting, or sealing required. If you want a fully custom color, our Unfinished Slat Wood Wall Panels are the better starting point.
Q: Is this available in 106"?
A: The Driftwood panels are available in 94" only, which suits standard 8' ceiling heights. For taller walls, panels can be stacked with seams offset for a nearly seamless result. Contact our team at (858) 261-4068 if you have questions about tall-wall installations.
Q: Is an end cap included?
A: Yes — each box includes one end cap panel (94" × 0.8") for finishing exposed edges on the perimeter of the installation.
Q: Do these panels help with sound control?
A: These are cladding panels, not acoustic panels — they don't include sound-absorbing felt backing. The slatted surface helps diffuse sound reflections and reduce echo compared to a flat wall. For dedicated acoustic performance, see our Acoustic Wall Panel collection.
Q: Can the panels be cut to fit?
A: Yes. Use a circular saw, miter saw, or fine-tooth hand saw to trim panels around outlets, corners, or at wall edges.
Q: Are these panels water resistant?
A: Yes — the solid wood construction is water-resistant. These panels are designed for interior use and are not rated for exterior or wet-area applications.
Q: How long does installation take?
A: Most single accent wall installations can be completed in a few hours with proper preparation.
Q: Is free shipping included?
A: Yes — free shipping within the contiguous United States.
Q: Do you have a showroom?
A: Yes — 10926 Woodside Ave Suite A, Santee, CA 92071. Monday–Friday, 8am–4pm.
Explore More Products
Discover more premium home improvement solutions designed for durability, style, and performance.